
最近新しい職場で四苦八苦しているあしぺんです。
業務でpythonを使う機会があって、matplotlibを使って3次元の図化をしたかったのですが、うまくいかず苦労したことがあったので、そのときの解決方法を残しておこうと思います。もし同じ苦しみを持った方がいたら、解決方法になれば幸いです。
準備:jupyter labでmatlotlib
これは特に関係ないのですが、私の使っている環境です。jupyter noteの進化系?jupyter labが便利だったので、簡単な計算とかはこれでやってます。ただこれでnote上にmatplotlibの図を表示させるのには一工夫いるみたいです。
詳しくはこちらのサイトに書いてあるのでこれをそのまま使っている仮想環境やらにインストールするだけです。
またアニメーションをgif画像として保存するには”ImageMagick”というものをインストール必要があるみたいで、その方法もこちらのサイトに記載されているとおりにやれば大丈夫でした。
これで準備は整いました。以下のコードはこれらのインストールを済ましてからjupyter labで実行する必要があります。普通にpythonのプログラムで動かす場合は上の方はいらないかもしれないですね。
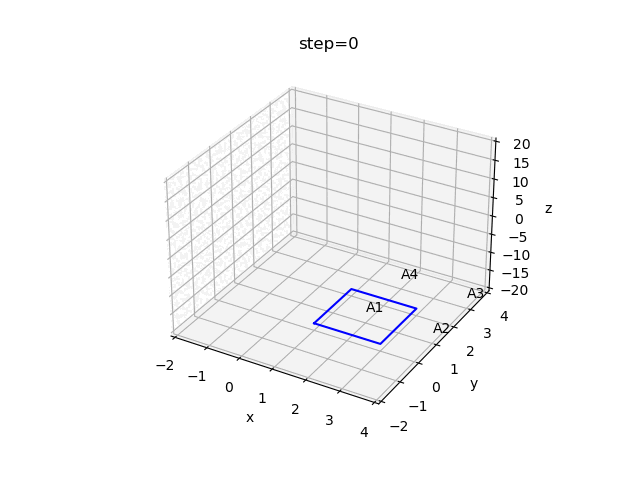
本番:matplotlibで3次元螺旋プロット
今回のコードをズドンと以下に示します。
|
1 2 3 4 5 6 7 8 9 10 11 12 13 14 15 16 17 18 19 20 21 22 23 24 25 26 27 28 29 30 31 32 33 34 35 36 37 38 39 40 41 42 43 44 45 46 47 48 49 50 51 52 53 54 55 56 57 58 59 60 61 62 63 64 65 66 67 68 69 70 71 72 73 74 75 76 77 78 79 80 81 82 83 84 85 86 87 88 89 90 91 92 93 94 95 96 97 |
#jupyter lab Python 3.8.11 import numpy as np import matplotlib.pyplot as plt from mpl_toolkits.mplot3d.axes3d import Axes3D from matplotlib.animation import FuncAnimation from IPython.display import HTML %matplotlib widget #←これがjupyter labでは必要 # パラメータ分割数 n = 128 # パラメータtを作成 t = np.linspace(-6*np.pi, 6*np.pi, n)#等差数列 # 螺旋構造の座標 x1 = np.cos(t) y1 = np.sin(t) z1 = t x2 = np.cos(t)+2 y2 = np.sin(t) z2 = t x3 = np.cos(t)+2 y3 = np.sin(t)+2 z3 = t x4 = np.cos(t) y4 = np.sin(t)+2 z4 = t # グラフの初期設定 def init(): ax.set_xlim(-2, 4) #x座標の範囲 ax.set_ylim(-2, 4) #y座標の範囲 ax.set_zlim(-20, 20) #z座標の範囲 ax.set_xlabel("x") #x座標のラベル ax.set_ylabel("y") #y座標のラベル ax.set_zlabel("z") #z座標のラベル return ln1,ln2,ln3,ln4,line_1234,title,text1,text2,text3,text4,# blit=Trueの場合は戻り値が必要 # グラフの更新 def update(frame):# frame=1ステップ title.set_text('step={}'.format(frame)) #タイトルの設定 if len(text1) > 0: #テキストが設定されている場合要素を削除 text1.pop().remove() #←このpop().remove()はまだよくわかってない text2.pop().remove() text3.pop().remove() text4.pop().remove() text1_, = [ax.text(x1[frame]+1, y1[frame]+1, z1[frame]+1, "A1")] #テキストラベルの作成(座標とテキスト) text2_, = [ax.text(x2[frame]+1, y2[frame]+1, z2[frame]+1, "A2")] text3_, = [ax.text(x3[frame]+1, y3[frame]+1, z3[frame]+1, "A3")] text4_, = [ax.text(x4[frame]+1, y4[frame]+1, z4[frame]+1, "A4")] text1.append(text1_) #テキストラベルの追加 text2.append(text2_) text3.append(text3_) text4.append(text4_) ln1.set_data(x1[:frame], y1[:frame]) #プロット座標1(x,y) ln1.set_3d_properties(z1[:frame]) #プロット座標1(z) ln2.set_data(x2[:frame], y2[:frame]) #プロット座標2(x,y) ln2.set_3d_properties(z2[:frame]) #プロット座標2(z) ln3.set_data(x3[:frame], y3[:frame]) #プロット座標3(x,y) ln3.set_3d_properties(z3[:frame]) #プロット座標3(z) ln4.set_data(x4[:frame], y4[:frame]) #プロット座標4(x,y) ln4.set_3d_properties(z4[:frame]) #プロット座標4(z) line_1234.set_data(np.array([x1[frame],x2[frame],x3[frame],x4[frame],x1[frame]]),np.array([y1[frame],y2[frame],y3[frame],y4[frame],y1[frame]]))#ラインのx,y座標!np.arrayでないとエラー line_1234.set_3d_properties(np.array([z1[frame],z2[frame],z3[frame],z4[frame],z1[frame]]))#ラインのx,y座標!np.arrayでないとエラー return ln1,ln2,ln3,ln4,line_1234,title,text1,text2,text3,text4,# blit=Trueの場合は戻り値が必要 # figureを生成する fig = plt.figure() # axをfigureに設定する ax = fig.add_subplot(111, projection='3d') # タイトルの設定 title = ax.set_title('step') # ラベルのリスト text1,text2,text3,text4 = [],[],[],[] # 各プロットの初期状態 ln1, = ax.plot(x1[0], y1[0], z1[0],'bo', markersize=2) ln2, = ax.plot(x2[0], y2[0], z2[0],'bo', markersize=2) ln3, = ax.plot(x3[0], y3[0], z3[0],'bo', markersize=2) ln4, = ax.plot(x4[0], y4[0], z4[0],'bo', markersize=2) # ラインの初期状態 line_1234, = ax.plot([x1[0],x2[0],x3[0],x4[0],x1[0]],[y1[0],y2[0],y3[0],y4[0],y1[0]],[z1[0],z2[0],z3[0],z4[0],z1[0]],c='b') # アニメーションの関数 ani = FuncAnimation(fig, update, n, init_func=init, blit=True, interval=50, repeat=False) ani.save('anim.gif', writer="imagemagick")#gif動画を作成する場合(ImageMagickのインストールが必要) plt.show() |
いちばん苦労したのが以下の部分
|
1 2 3 |
#jupyter lab line_1234.set_data(np.array([x1[frame],x2[frame],x3[frame],x4[frame],x1[frame]]),np.array([y1[frame],y2[frame],y3[frame],y4[frame],y1[frame]]))#ラインのx,y座標!np.arrayでないとエラー line_1234.set_3d_properties(np.array([z1[frame],z2[frame],z3[frame],z4[frame],z1[frame]]))#ラインのx,y座標!np.arrayでないとエラー |
このラインのプロットが描けなくて1日くらい使った;;どうやらnp.arrayじゃないと受け付けてくれないらしい。ともかく解決できてよかった
完成したのが以下のgif画像
まとめ
pythonは色々ネットに情報が整っているけれど、いざ自分でやろうとなると詰まってしまうことも多々あります。僕だけ?まあひとつひとつこなしていくしかないですね。

コメント